1. Overview
In this article, we will understand the MVC framework of Spring and SpringBoot. We will create a simple MVC example to demonstrate the MVC framework.
2. Dependencies
To get started, let’s first add the required dependencies to the project.
2.1. Spring Boot mvc dependencies
The SpringBoot provides the starter dependency spring-boot-starter-web for the MVC. This dependency brings in all other required dependencies such as spring-webmvc and spring-web into the project.
You must also add dependency for view template. In this article, we will use thymeleaf template.
<dependency>
    <groupId>org.springframework.boot</groupId>
    <artifactId>spring-boot-starter-web</artifactId>
</dependency>
<dependency>
    <groupId>org.springframework.boot</groupId>
    <artifactId>spring-boot-starter-thymeleaf</artifactId>
</dependency>
2.2. Spring mvc dependencies
If your project is not spring boot, then you can add the spring-webmvc dependency in the Spring project to use MVC. The spring-webmvc has all other required dependencies such as spring-web and other core dependencies like spring-core, spring-beans. So no need to declare those dependencies explicitly.
You should also add thymeleaf or jsp dependency for your view component.
<dependency>
    <groupId>org.springframework</groupId>
    <artifactId>spring-webmvc</artifactId>
    <version>5.3.12</version>
    <scope>compile</scope>
</dependency>
<dependency>
    <groupId>org.thymeleaf</groupId>
    <artifactId>thymeleaf-spring5</artifactId>
    <version>3.0.12.RELEASE</version>
    <scope>compile</scope>
</dependency>
<dependency>
    <groupId>org.thymeleaf.extras</groupId>
    <artifactId>thymeleaf-extras-java8time</artifactId>
    <version>3.0.4.RELEASE</version>
    <scope>compile</scope>
</dependency>
3. Spring MVC
The Model-View-Controller (MVC) is an architectural design pattern that categorizes an application into three main logical components:
- the model (data of the application)
- the view (user interface that renders the model data on the screen. You can use template engines such as JSP, Thymeleaf)
- the controller (handles the request and returns the corresponding view for rendering)
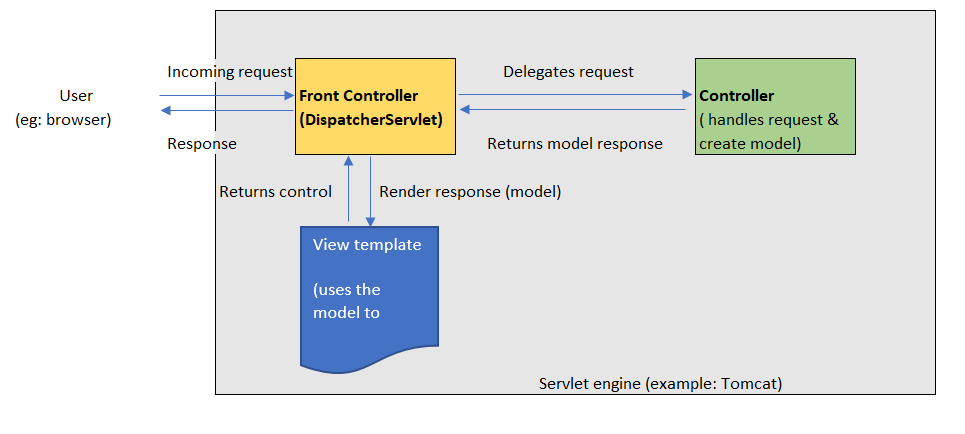
The Spring Web MVC is a module of the Spring framework to support this design pattern. This framework is request-driven, designed around a DispatcherServlet that handles all the HTTP requests and responses.
This DispatcherServlet works as a front controller, meaning it handles all requests that come for a resource in an application and then delegates the request to the relevant controllers.
Once the controller returns the data, it passes that model data to the corresponding view and returns the view.
4. Enable MVC
You should enable MVC in your project so it will scan and register the controllers, mappings,
type converters, message converters, exception handling and so on.
4.1 Java Configuration
To enable MVC for Java configuration, add the annotation @EnableWebMvc to one of your @Configuration classes.
@Configuration
@EnableWebMvc
public class WebConfig {
}
4.2. XML configuration
You can enable MVC using the XML configuration by adding <mvc:annotation-driven/>.
<?xml version="1.0" encoding="UTF-8"?>
<beans xmlns="http://www.springframework.org/schema/beans"
    xmlns:mvc="http://www.springframework.org/schema/mvc"
    xmlns:xsi="http://www.w3.org/2001/XMLSchema-instance"
    xsi:schemaLocation="
        http://www.springframework.org/schema/beans
        http://www.springframework.org/schema/beans/spring-beans.xsd
        http://www.springframework.org/schema/mvc
        http://www.springframework.org/schema/mvc/spring-mvc.xsd">
    <mvc:annotation-driven/>
</beans>
4.3. Spring boot
The Spring Boot automatically enables MVC when it sees spring-webmvc on the classpath.
This dependency instructs the Spring boot to treat the application as a web application and activates key behaviors such as setting up a DispatcherServlet.
5. Spring mvc Controller
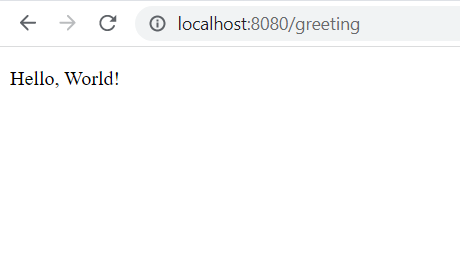
Let’s create a very simple controller to greet “Hello World”. The below controller GreetingController handles all the HTTP GET “/greeting” requests.
@Controller
public class GreetingController {
        @GetMapping("/greeting")
	public String greeting(@RequestParam(name="name", required=false, defaultValue="World") String name, Model model) {
		model.addAttribute("name", name);
		return "greeting";
	}
}
The @GetMapping annotation maps the HTTP GET requests to /greeting to the greeting() method.
@RequestParam binds the value of the query string parameter name into the name parameter of the greeting() method. This query string parameter is optional, and the defaultValue is World. We are adding the value of the name parameter to a Model object. This object is accessible to the view template.
6. View
We are using thymeleaf template for View component. The below thymeleaf greeting.html file takes the name attribute of model
<!DOCTYPE HTML>
<html xmlns:th="http://www.thymeleaf.org">
<head>
    <title>Spring Web MVC</title>
    <meta http-equiv="Content-Type" content="text/html; charset=UTF-8" />
</head>
<body>
    <p th:text="'Hello, ' + ${name} + '!'" />
</body>
</html> 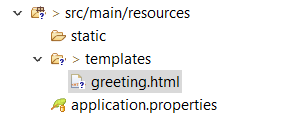
Thymeleaf performs the server side rendering. It parses the greeting.html template and evaluates the th:text expression to render the value of the ${name} parameter that we set in the controller.
7. Conclusion
To sum up, we have seen a simple example to demonstrate the Spring Boot and Spring MVC in this article.